Friday, March 27, 2009

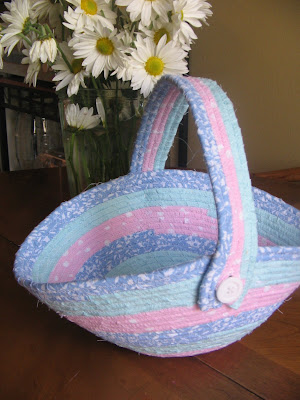
Another Basket

The second basket is all finished up waiting to be filled with grass and goodies. I love the changes I made in the construction of this basket. The strap is awesomely sturdy and the shape of the bowl works so much better. I'm not to happy with the big stripes and the colors, but oh well it's just for one day a year.

I'm actually working on quite a few other projects including a new embroidery that I am really excited about. This weekend will be filled with lots of down time so perfect for this breezy weather.

Tuesday, March 24, 2009

Easter Baskets

A couple of months ago I came across this tutorial for how to make fabric bowls via Linda's great blog. As soon as I knocked out a few WIP's I got started, but alas all the colors I used ended up looking to "Eastery" so a made an Easter basket!

I used the basic bowl tutorial for the base and then made a handle out of some remaining cording working back and forth instead of in a spiral. I left button sized holes in the end of each handle big enough to squeeze a button through.
On my next one I think I will be making the handle with 6 cording sections instead of just 4 and I may even make the handle shorter. While this project was time consuming it was really a lot of fun, repetitive yet gratifying.

Sunday, March 22, 2009

Hello Spring!

Daffodils have been popping up all over town, giving me a new found appreciation of Spring. I keep spotting these bright yellow beauties all over town as I drive to and fro on many meticulous errands and they brighten my day. I picked these up at the grocery store in order to bring some of that nice warm feeling into my home.
Of course as Spring is now here one of my favorite holidays is fast approaching Easter! I just love all the brightly colored eggs, the matching dresses, the chocolate eggs and bunnies, such a sweet celebration of Spring! I made these matching twirly skirts for the girls from fabric in my stash. These were such a quick sew, just a couple of found hours and there done!

I love the little chicks, I've been wanting to use this fabric that my mom gifted my for years, so happy I finally got the chance. The girls are really looking forward to wearing them to church in a few weeks.

My favorite part however is the twill tape that I picked up when perusing the scrap booking store. P's tags have purple stripes and L's have pink and that along with their names written on with fabric marker will finally stop M from asking "who's is this?" all the time.
My brothers wedding was yesterday and I think it may take me days to recover. I plan to lounge around, watch t.v. on my computer, finish up a few projects and hopefully blog about them. A little bit of down time before we start up with some more fun Spring time activities.

Tuesday, March 17, 2009

St. Patrick and the Baroness

The corned beef and cabbage is in the crockpot, the Irish soda bread is cooling on the stove, and the green jello is becoming a united gelatinous form in the fridge. We are all clad in green and pinching each other anyways, it must be St. Patricks day! I managed to finish my new green beret in time too, YaY! It's the Baroness Beret from Ravelry, I love this pattern. This was my first time knitting a lace pattern and while it was much harder and took lots of concentration, the results were well worth it (at least I think so).

Hope everyones having a great St.Patty's Day!

Post Publish: I wanted to add a nice detail shot of the Baroness Beret. I stretched it over a dinner plate which also how I blocked it.

Monday, March 16, 2009

Patchwork Pillow

I mentioned on Saturday's post that I got some good sewing time in. Well, this wedding gift was the main fruit of this well enjoyed time. I designed, cut, sewed and stuffed this pillow in just a few hours. As you can see I still have to stitch up the bottom, but I am saving that for a still moment. I really like how this turned out, so much in fact that I am dreaming up a similar one to make for my bed.

Saturday, March 14, 2009

My Floors Covered In Dirt....And I Like It

We got our finally got around to planting our seedlings today. M was such a good Dad explaining everything and letting the girls dig in. It was one of those days where you truly feel the Lords blessings in your life. I sewed, we ate good food, dug in the dirt, and took time to enjoy the day.
You can really see all the dirt on my floor here, I really got to put my Dyson to the test tonight, so even the clean up was kind of fun!
Hope everyone else is having a great weekend!

Friday, March 13, 2009

Feeling Green

Green has been popping up all around me and you know what? I LOVE IT! I feel so giddy about all the changes going on around here. I'm trying to move forward in our homeschooling and incorporate some more "hands on" items. Our first was this terrarium. The soil, rocks, jar and little toy are all things we had lying around, we just had to make a fun trip to the nursery for the plants. That was a fun weekday trip, the girls rode around in the wagons they had there, we bought seeds for our garden, flowers, and of course talked the guys ear 0ff about terrarium stuff. We even bought the girls some lemon fresh off an employee's tree that same morning.

We promptly went home and after lunch and nap we put it all together. I had a whole lot of fun, the girls however were less excited then I expected. P wouldn't touch the dirt (weird I know) and L wanted to know if she could go do her page work instead (gotta love that type A personality). It was still a lot of fun though and now I have some beautiful greenery in my home.


After about 5 attempts I finally figured out how I wanted my new cowl to look. I finally settled on the Abstract Caterpillar Cowl on Ravelry. I'm lovin' the way this looks, however the yarn is so soft that it isn't quite stiff enough. Oh well, I love it anyways!

Friday, March 6, 2009

Time to Teach

Yesterday I spent my time wisely. I wisely ignore the dishes, knowingly forgot to fold the laundry, and made the smart decision to have a late dinner. Things got done in their own time and a few have been put off for another day.

I think that I have mentioned on here that my little sister A comes over to hang out a couple of times a week. She plays with the girls so I can clean and loves to eat our "exotic" food which is quite different then what she's used to. Well today was her day to finally learn to knit. I could have taken her for a lesson at the LYS (local yarn shop) for only a few dollars and saved myself the time and headache, but this was something I wanted to do. She has taken to it well and I am really happy I got to do this.

Since she was here I decided to bake some bread, so along with the usual sandwich bread I made a loaf of Garlic and Herb bread to with our dinner. This is the fifth time I have made this and I finally managed to snap a picture before the devouring began. Per my friends request since she is always sweet enough to read this blog I am also including the recipe.

Garlic and Herb Bread
2 cups unbleached flour
.5 cups of wheat flour
1 tsp salt
1 Tbsp of Chico Spice Garlic and Herb (This is a local thing, but I'm sure another Garlic seasoning mix would work, you could also use rosemary and other herbs to make your own custom seasoning)
1 Tbsp of olive oil (plus 1-2 Tbsp more)
2 tsp active dry yeast
2 pinches of sugar
1 cup of warm water (110 degrees)
Mix the water, yeast and sugar in a bowl and let sit for 10 minutes, preheat oven to 200 degrees. Put flours, salt and seasonings in food processor and turn on to mix. Feed in olive oil and yeast mixture, pulse 30 times. Turn off oven. Pour about a tbsp of olive oil into a medium size bowl. Flour or oil hands and take dough out of food processor being very careful of the blades. Then smush into somethings slightly resembling a ball, dough will be sticky, but it shouldn't be so bad that you can't do this, if it's runny then you may want to add more flour, but I have never had this problem. Then plop it into yourbowl with oil in it and roll it around until it is coated in oil. Place cheesecloth or thin cloth napkin atop and place in the warm (but OFF) oven.
Let rise 1 hour. Then take out of the oven and turn it back on to 200 degrees. Grease large baking sheet. Take dough out of bowl and mush it into a ball, making sure that harder spot that was on the top of the rise bowl is moved to the center. Then place ball onto baking sheet and pat down to a 10" circle. Turn off the oven, cover dough with cloth and put back into oven. Let rise half hour. After 20 minutes you will want to take dough out of oven and preheat oven to 425 degrees. When 30 minute rise is done, take cloth off dough and gently brush it with olive oil. Place in oven for 18-20 minutes, bread will be golden brown and medium brown around the bottom edge (not burnt though). Let cool 10 minutes and enjoy!
I tried to make this recipe very beginner friendly so even some non bread making people can give it a try! If you are looking for better instructions on general bread making I would recommend going over to The Fresh Loaf and clicking on the lessons in there top bar, they have a lot of extremely valuable information in them.